Clem's Beef Short Rib Pie
Pies are always a welcome meal in the colder months. As we will be in winter in a few days, I thought that as a test of my new oven, I would bake a family-sized pie.
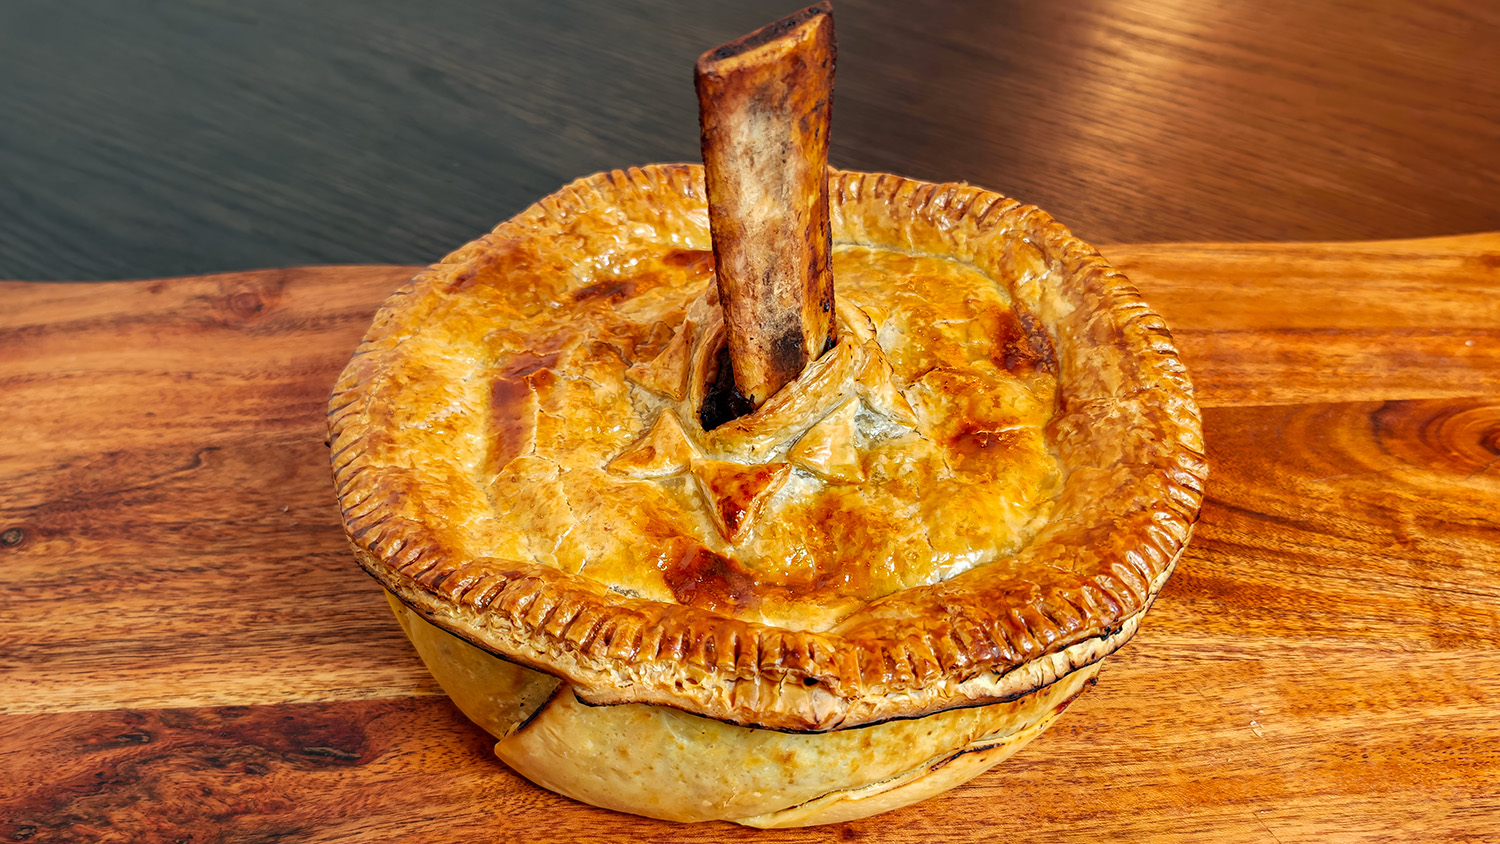
I was going to make a standard beef pie until I saw a pie baked
on YouTube with a bone sticking out of the centre: That was one
with a cut femur standing upright. Soon I saw others make a
Standing Rib Pie and that took my fancy as it is relatively easy
to obtain beef short rib cuts at my place.
Here's how I made the pie:
COOKING THE BEEF
-
Get
around 1.2 kg (dressed weight without the bone which means
more than 1.2 kg with the bone included in the weight)
Beef Short Ribs.
Cut the beef off the bone except for one piece which is trimmed to expose the bone above where you will be placing the pie crust. The cut the released beef pieces in large chunks.
Note that you can also use only one beef short rib and the rest can be chuck steak beef (any beef which will come out tender in a low temperature, slow cook will be good).
-
Get about 700 g of
mushroom.
I used medium-sized button mushroom.
Cut these into halves.
-
Finely slice three medium sized
brown onions
and around 4 - 5 cloves of
garlic.
-
Heat up
a couple of tablespoons of cooking oil in a saucepan
and caramelize the onions.
This involves slow frying the onions on low heat for some 15 to 20 minutes.
You should not use high heat as this ends up with over-fried onions (different-tasting).
Set aside when done.
-
In a
heavy saucepan (I used a Dutch Oven), heat up 3 tablespoons
of cooking oil and begin to brown off the beef pieces
including the one whole short rib, in batches so as not to
overcrowd the pan.
If done is small lots, the pan will not have standing water from the beef (with water, the beef will be stewing rather than frying).
What is essential to building flavour is a very good browning of all the beef.
-
When the last of the beef is browned,
combine all of them and add the caramelized onions.
Now add around 30 - 40 mL of Worcestershire Sauce (to your taste) and continue to fry for some minutes.
Now add a sprinkling of thyme and Rosemary (to taste), two Bay leaves, and one Star Anise.
-
The next step is to add liquid beef
broth to the fry to make a stew. Instead of
beef stock,
you may choose to add hot water and beef stock cubes
instead of liquid beef stock (or chicken stock cubes as you
please). The initial amount of water should cover all the
beef.
-
Lid the
sauce pan and reduce the heat to a simmer and let the stew
cook over 2 to 3 hours depending on how tender you would
like the beef to end up. It is nice to have the cubes remain
intact but which will fall apart with just some fork action.
You will need to check on the stew through the cook to ensure that there is always enough water in it and that what is cooking does not catch at the bottom and burn.
In the last half hour of stewing, you can add all the mushrooms to cook.
It is not unusual to add vegetables such as carrots and peas in addition to mushroom, but you can just as well serve vegetables as a side dish e.g. as in buttered snow peas, baby carrots and broccolini.
-
At the
end of the stewing period, check the amount of fluid left in
the stew. Here is where you decide how wet you want your pie
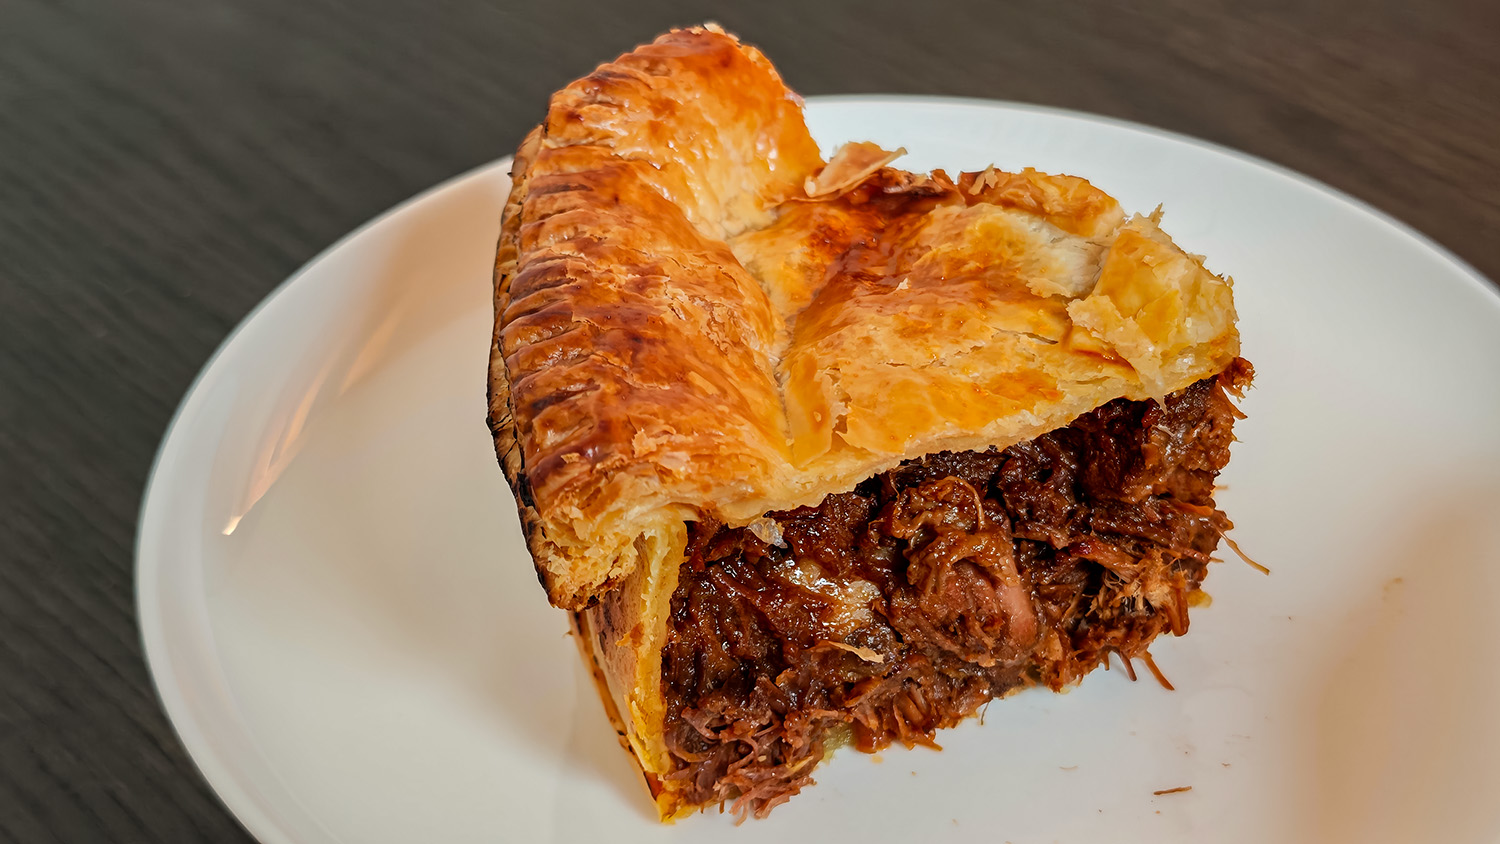
filling to be. It is best that the pie filling is not too
wet because you don't want the pie bursting or leaking
during baking, or messy to eat when served. A stodgy pie
filing is perfectly fine because you can always serve the
pie with gravy later.
You should also take out the Bay leaves and Star Anise at the end of stewing.
-
To thicken the stew (or now pie
filling), add a thickening agent of a quantity which will
give you your desired thickness of stew. For this, you can
add a thick starch (cornflour)
slurry (thick because you don't want to add too much water)
and stir it in. Be careful not to break up any cubes shapes
which you have retained in the beef through your stewing.
Alternatively, you can use what I use which is dried potato mash powder granules, to thicken your pie filling.
After thickening, is the important step of letting the pie filling cool down to room temperature before use in making your pie. Hot filling will ruin your pie pastry before it has a chance to be baked.
ASSEMBLING THE PIE AND BAKING IT
-
Get a
baking or pie tin of around
21 cm in diameter and 6 cm high for the amount of filling
which you have made.
I used a spring-form baking tin which means that it has sides which can be sprung loose and the bottom released. This makes for easy removal of the pie at the end of baking.
-
Line the bottom of the baking tin with
short crust pastry.
Ensure that there is pastry which over hangs the edges of
the pie tin. This overhang is needed to seal against the top
sheet of pastry which you will soon be adding.
I used store-bought pastry. It is your choice to use one or two layers of the pre-made pastry. I found that one layer is thick enough so as not to form leaks but you may like a thicker pastry lining. If the pastry pre-cuts are too small, you will need to use multiple sheets and press down to seal the resulting joint seams.
-
Take the
one beef short rib which you have cooked in your stew and
position it at the centre of your pastry lined pie tin. The
rib will stand up above the pie (protrude from the pie
crust) since it is longer than the height of your pie tin.
Now add your pie filling, ensuring that there are no gaps as you fill.
Fill right up to the top of the pie tin if you can. If you don't have enough filling, that will still be fine except that your pie crust top will be below your pie edges.
-
Now take a sheet of
puff pastry
(I used store-bought), cut a slit in
the position of where the short rib bone will protrude out
of the pie top.
Carefully place the puff pastry over the rib and let it down over the top of the filling in the tin.
Press down on where the bottom and top pastry sheets meet to seal the pie up. In order to further secure the seal, you may choose to take a fork and make indents all along the edge of the pie where the bottom and top sheet meet and had been pressed together previously .
Now egg wash the puff pastry top.
-
Follow
the instructions for baking your pastry.
In my case the baking temperature for the short crust pastry was 160oC and 180oC for the puff pastry.
Thus, I had to bake firstly at 180oC to puff up the top of the pie and then lower the temperature to 160oC to finish baking off the short crust pastry. All in all, It took me some 30 minutes at least to bake the pie as described. The important thing is to monitor the bake as you go along to ensure doneness and yet no burning.
If successful, you should end up up with this:
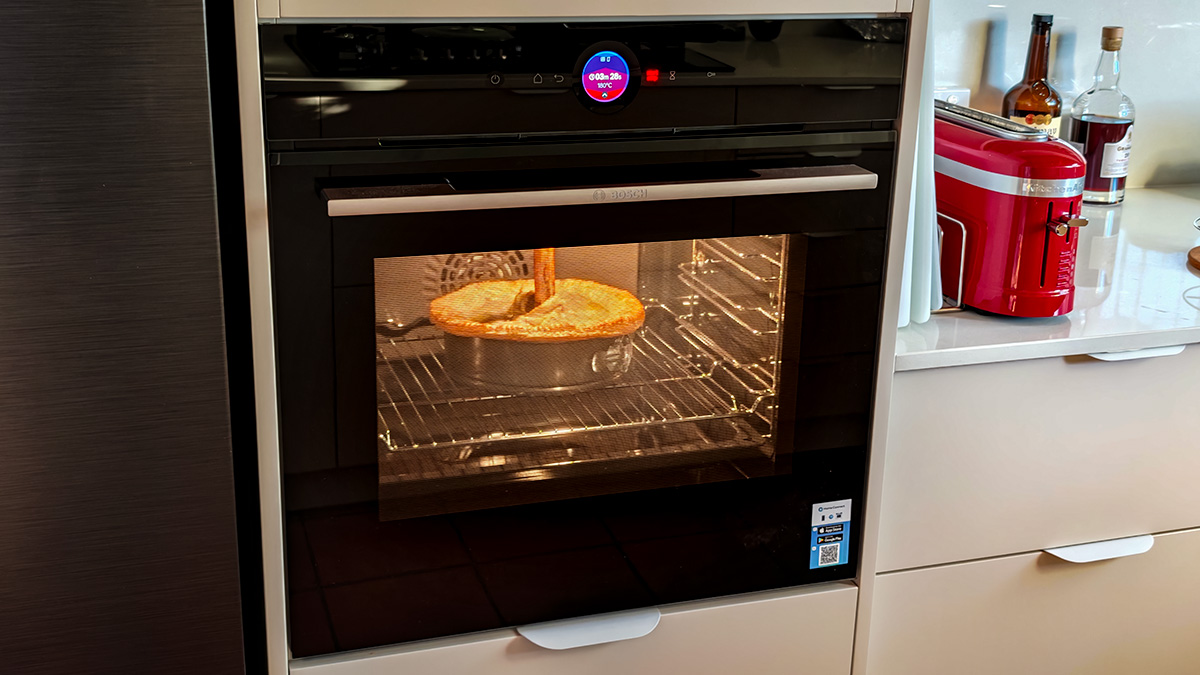
First serious bake using
the new oven
Clem's Beef Short Rib Pie
30 May
2026
Happy Birthday, Mum
Created by Clem Kuek
