Clem's
Polo Pao
Polo Pau in Cantonese means
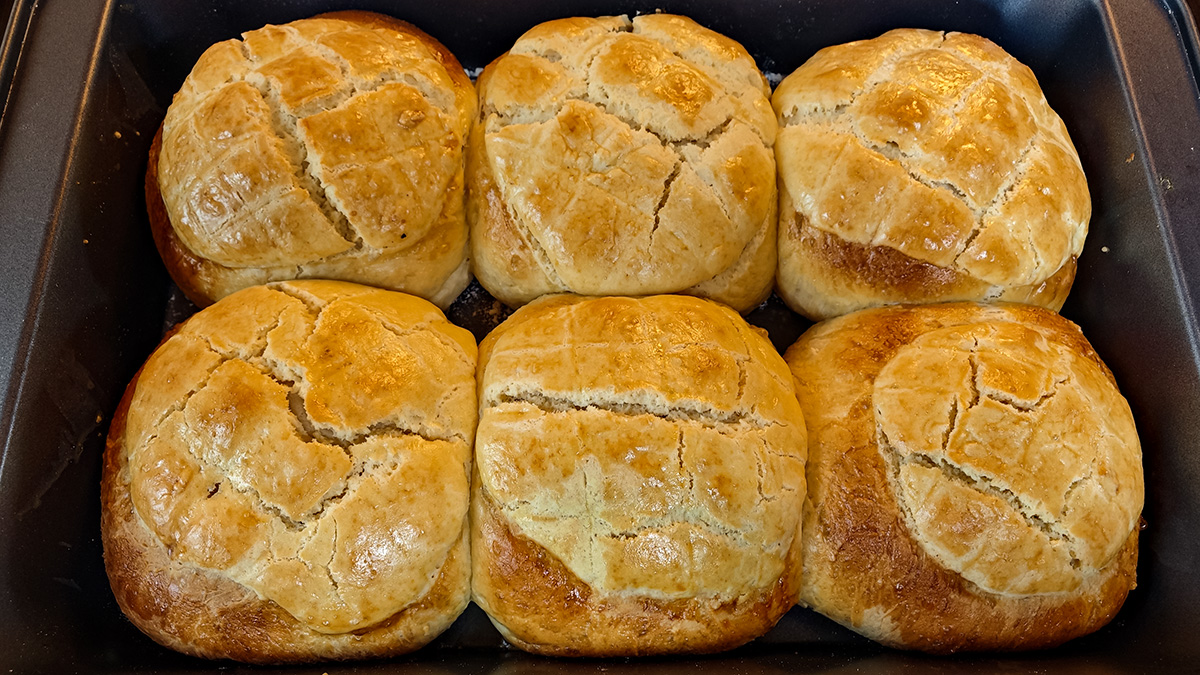
"pineapple bun". No, there is no pineapple in the recipe. The
description arises from the striations made on the crust of the
buns which often comes out after baking, looking like the
pattern seen on pineapple skin. As a bun, it is in the same category
as the "Rotiboy" (which has a coffee-sugar crust).
There is a bun found in Kuching called in Hokkien, "Gu Yew Pau"
which means butter bun. The latter, though, has the butter
batter as a filling rather than a crust. I do think that having
a crusty butter-sugar coating on a soft bun as with Polo Pau makes for a nice product.

Freshly made Polo Pau baked by Clem
It is not a difficult baked good
to make - it just takes some time. Here's how to make them:
INGREDIENTS
For the buns
To make six large buns, the following are required for the dough
- 200 g of bread
flour (this is high-protein [meaning gluten] flour).
- 110 mL full cream milk.
- 25 g sugar.
- 45 g of unsalted
butter.
- 1 egg (the
other half goes to ingredients for the crust).
- some 5 g of instant
dried yeast.
- 3 g salt.
This makes for a soft bun, which means that the dough will be very tacky. Increase the quantity of flour if you want to work more easily with the dough but be mindful that the less wet the dough is, the harder the bun will turn out. Alternatively, flour your hands well when handling the dough.
For the bun crust
- 55 g melted butter.
- 65 g sugar.
- 105 g of plain
flour.
- 2.5 g teaspoon
baking powder.
- 1/2 teaspoon salt.
- 1 egg.
This will also make for
a very tacky batter, Flour your hands well when handling it.
METHOD
Make the bun dough balls
- Mix (by hand, or in
a mixer with a dough hook), the flour, milk, egg,
sugar, salt and yeast powder.
- When all the
ingredients are well incorporated, add the butter in pieces.
- Continue
kneading/mixing until the dough has become just sticky
enough to want to cling to your hands or the walls of the
bowl and yet will release relatively easily.
-
Roll the dough together into one mass, cover with plastic
wrap in a bowl and let the yeast do its work in producing
carbon dioxide from the added sugar. Be sure that the dough
is sitting at an ambient temperature of at least 30 degrees
centigrade so that the yeast are active.
It is also at this time that the gluten in the flour hydrates properly and begins to form a network structure, thus giving the dough elasticity. It is this network structure and elastic character which traps the carbon dioxide produced by the yeast to give the dough its airiness and bounce (air pockets in the dough get sealed in when it is cooked).
This stage of dough handling is called proofing and it takes time for gas to be evolved and the gluten network to form. This is why the dough is set aside a few times during bun-making (and of other bakery products which are leavened).
Set the dough aside and let it proof in a warm spot.
At this time you may want to start working on the bun crust batter.
-
After one hour of proofing the dough, confirm that the dough
has increased in size (at least doubled), and then knead it
again for a minute or two to release most of the large
pockets of gas.
-
Divide the dough into 6 portions (or more if you like
smaller buns).
-
Knead and roll into balls and place them on a baking-papered
baking tray.
-
Flatten the tops of the balls slightly so that they can
take on the crust batter later.
-
Set the tray aside for around an hour to allow the balls to
rise through further fermentation.
Make the bun crust batter
Note that the quantities stated make for a certain amount of
crust on each bun. If you have a sweet tooth and prefer thicker
crusts, make more of this batter by increasing all the
ingredients in proportion.
-
Mix all the ingredients together until smooth.
-
With well-floured hands, gather the batter into a ball and
roll it into a log shape.
-
Divide the log into six portions (or more as appropriate).
-
Roll each portion into balls.
-
Flatten the balls into flat discs of a size to cover the top
third of the awaiting buns.
Assemble the bun and crust, and bake
-
Pre-heat your oven to 180°C.
-
Place each batter disc on top of each bun a secure with
gentle pressing (the buns will be very soft).
-
Use a knife or dough scraper to make criss-cross patterns
(resembling the pattern on a pineapple) on the crust batter.
-
Glaze the entire top of each bun with beaten egg using a
brush.
-
Bake the bun/crust dough balls for around 20 minutes.
Monitor throughout the baking such that should dark browning occur, stop the baking.
-
Remove the buns from the oven after baking time has been
reached and allow the buns to cool before trying them.
The "pineapple" crust will be crunchier when they have cooled down.
25 August 2024
Created by Clem Kuek
